Demystifying the Kubernetes Iceberg: Part 7
Categories:
11 minute read
This is the seventh article of the “Demystifying the Kubernetes Iceberg” series. My goal for this series is to explain all concepts mentioned in the “Kubernetes Iceberg” diagram by Flant.
This is the iceberg:
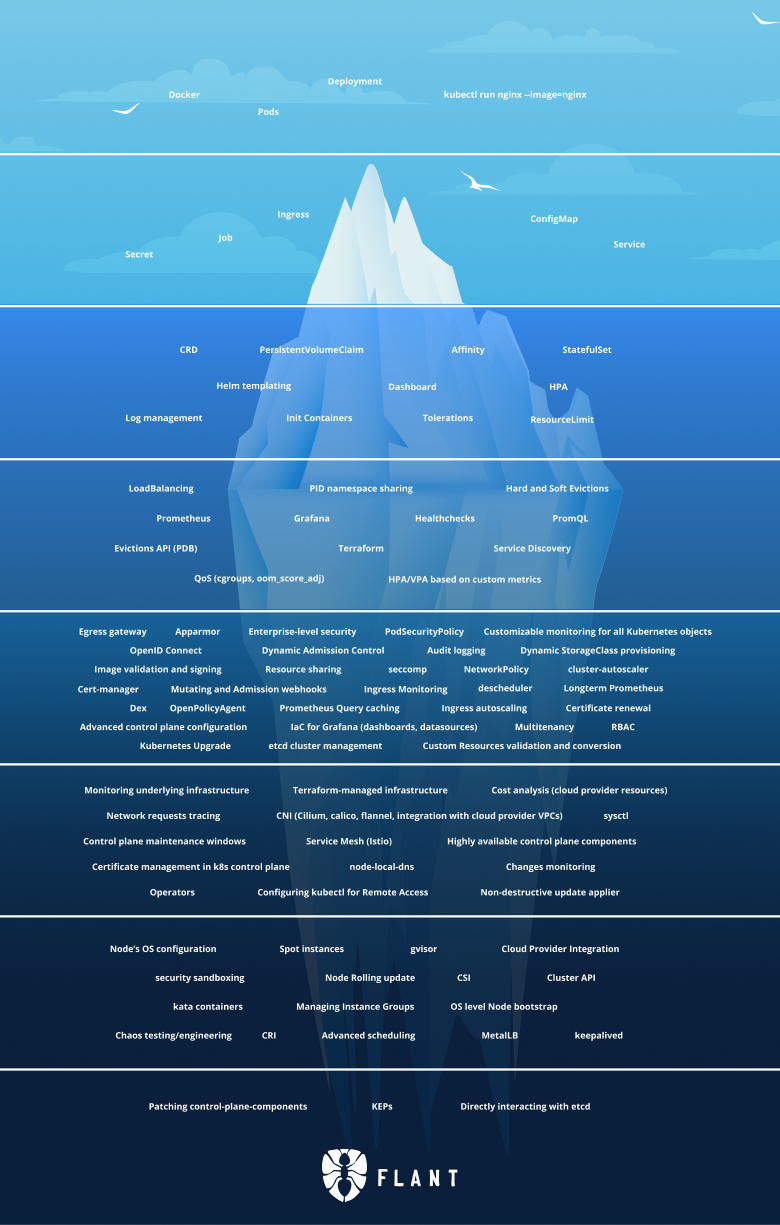
In this article, we will continue with the second-to-last Tier 7 of the iceberg.
You can find the others articles here:
I will publish one article each week until I complete the whole iceberg.
Tier 7
Node’s OS configuration
Kubernetes Nodes are virtual or physical machines that run an OS (typically Linux).
Kubernetes manages the Nodes and assigns Pods to them if they are Healthy.
A Kubernetes Node can be configured the same way you can configure any other machine.
Different Kubernetes providers provide you different ways of configuration.
Most providers (GKE, AKS) allow you to create config files which you use to create a Node. These config files contain various stuff such as CPU limits, file handling limits, OS threshold, etc.
Spot instances
Spot instances are a cost-effective feature provided by cloud providers. It allows you to request unused virtual machine instances at a lower price.
You can set the maximum price you are ready to pay for a VM; if such is available, one will be provision for you. If the price increases, the virtual machine will be stopped and assigned to someone else.
Using spot instances must be done with caution since you can lose the instance anytime.
Spot instances and Kubernetes
While not entirely reliable for production workloads, spot instances can work quite well with Kubernetes.
That is so because Kubernetes is best-suited for elastic, stateless workloads that can easily be rescheduled on different nodes if one goes down or scaled in and out.
Some cloud providers provide integration between spot instances and their Kubernetes offering. It allows you to run some part of your Kubernetes cluster on top of spot instances and rebalance/reschedule workloads once a spot instance goes down.
This can be a more cost-effective way of running Kubernetes.
Cloud Provider Integration
Using Kubernetes managed by a cloud provider will give you a lot of the other functionalities of that cloud provider integrated into your Kubernetes by default.
This is done as a selling point by the cloud providers, e.g. they provide you with more feature out-of-the-box. Also, it’s another way to lock you into their system (by providing you proprietary services on top of an open platform like Kubernetes).
One example for a Cloud Provider Integration is the Load Balancer Service.
One you create a Service with type: LoadBalancer Kubernetes will provision a Load Balancer in the cloud that the cluster is running in.
This is not possible with out-of-the-shelf Kubernetes that runs on-prem, unless you install and configure a controller that know how to provision a Load Balancer for this environment.
NOTE: This does lead to vendor lock-in, because the LoadBalancer Service is an abstract construct, and creating the same resource in a different cloud would have the same result - a Load Balancer will be provisioned for you.
Node Rolling Updates
A rolling update means having multiple instances of a workload, and updating them one by one, so that always at least one instances of a workloads is running, and there is no downtime.
The same is valid for updating the Kubernetes cluster itself. You can update the nodes one by one, with the latest Kubernetes components, without causing downtime to your cluster.
CSI
CSI stands for Container Storage Interface.
Its goal is to provide a unified interface for storage vendors that can write plugins that will work with each container orchestrator.
Kubernetes implements this interface as alpha in Kubernetes 1.9 and GA in Kubernetes 1.13.
This allows consumers to consume each storage vendor that has a CSI-compliant plugin. Before Kubernetes implemented this, the code that provisions storage was in-tree, and introducing a new storage type or even fixing a bug in an existing one was slow and hard and had to be aligned with the Kubernetes release process.
Cluster API
Cluster API is a project by SIG Cluster Lifecycle that aims to unify the process of provisioning and managing clusters, virtual machines, load balancers and everything else you need to run Kubernetes.
The need for something like this arose from the fact that there are 100s of Kubernetes distributions and installers, but no unified way of how they work. Cluster API serves as an abstraction on top of them. It can be implemented by anyone in whatever way they want.
For example, most cloud providers have implementations of Cluster API that provision and manage clusters in the respective cloud.
security sandboxing
Security sandboxing is yet another layer of isolation, on top of the existing ones.
It is done via additional hardening of the Pods runtime, isolating the Pods from one another even better than before.
It is enabled by secure runtimes such as gVisor and Kata containers.
gVisor
gVisor is an application kernel, written in Go, that implements a substantial portion of the Linux system call interface. It provides an additional layer of isolation between running applications and the host operating system.
gVisor includes an Open Container Initiative (OCI) runtime called runsc that makes it easy to work with existing container tooling.
The runsc runtime integrates with Docker and Kubernetes, making it simple to run sandboxed containers.
gVisor intercepts application system calls and acts as the guest kernel, without the need for translation through virtualized hardware. gVisor may be thought of as either a merged guest kernel and VMM, or as seccomp on steroids. This architecture allows it to provide a flexible resource footprint (i.e. one based on threads and memory mappings, not fixed guest physical resources) while also lowering the fixed costs of virtualization. However, this comes at the price of reduced application compatibility and higher per-system call overhead.
Kata containers
Kata containers is an open-source project that aims to build a container runtime that works with lightweight virtual machines that feel like a container but provide the isolation of a virtual machine.
The Kata container runtime is CRI-compatible, which means that it is supported by Kubernetes.
You can run Kata containers in Kubernetes by using either containerd or CRI-O.
Managing Instance Groups
A Managing Instance Group(MIG) is a group of virtual machines as is treated as a single entity.
This feature is provided by cloud provider for creating and managing big fleets of virtual machines.
In the context of Kubernetes, you can have a MIG that is a set of nodes, which are labeled in the same way. That way, you can have a Kubernetes cluster that runs on several MIGs, but different workloads get provisioned on different MIGs via Taints and Tolerations.
OS level Node bootstrap
Bootstrapping a Kubernetes node involving configuring a machine in a way that it’s able to function as a Kubernetes nodes.
That involves installing a container runtime, other Kubernetes related tools and configuring the cgroups and namespaces.
Tools like kubeadm help a lot with this process. Full guide on bootstrapping a Kubernetes node you can find here.
Chaos testing/engineering
Chaos Engineering is the discipline of experimenting on a system in order to build confidence in the system’s capability to withstand turbulent conditions in production.
Chaos Testing is testing a system by destroying random parts of it. In the case of software and micro-services architecture that could be disconnecting some of the nodes on which the software run and making sure that the other part of the system is still working or it has failed gracefully.
This methodology was made popular by Netflix, who runs a giant set of microservices.
If you are using Kubernetes, the simplest chaos test you can think of is deleting some pods or some nodes. Kubernetes is designed for scenarios like these and it will automatically recreates the pods and try to reassign them on the remaining nodes.
There are tools like Chaos Mesh and ChaosToolkit that will allow you to execute more complex chaos testing scenarios in your Kubernetes cluster.
CRI
CRI stands for Container Runtime Interface.
It defines an interface that is implemented by container runtime and called by Kubernetes to manage containers.
This allows for Kubernetes to support a variety of container runtimes and for those to be replaced without recompiling the Kubernetes code. It also allows container runtime developers to develop the runtime independently, instead of Kubernetes in-tree and release new versions and bug-fixed ones decoupled from the Kubernetes release cycle.
Also, see https://kubernetes.io/docs/concepts/architecture/cri/.
Advanced scheduling
The Kubernetes scheduler works pretty well in most cases - it makes sure that Pods are scheduled on Nodes that have enough resources, makes sure that ReplicaSets/StatefulSets are balanced across Nodes, etc.
However, sometimes we want to have even more fine-grained control. For example, to schedule a Pod on a node that has some specific hardware, to dedicate Nodes to specific services, etc.
This is where the advanced scheduling concepts come in. Most of these have been introduced in Kubernetes 1.6 and are already stable.
Node affinity/anti-affinity
Node affinity means that a Pod has affinity towards a Node.
On the Node side this is achieved via setting labels.
On the Pod side this is achieved via setting the spec.affinity.nodeAffinity property.
For example, this Pod spec will schedule the Pod only on Nodes that have the kubernetes.is/os:linux label:
spec:
  affinity:
    nodeAffinity:
      requiredDuringSchedulingIgnoredDuringExecution:
        nodeSelectorTerms:
          - matchExpressions:
              - key: kubernetes.io/os
                operator: In
                values:
                  - linux
requiredDuringSchedulingIgnoredDuringExecution means that Kubernetes will take this affinity into account when scheduling the Pod, but will ignore it once the Pod is scheduled, e.g. it will not reschedule the Pod if the Node gets this label removed.
The other option is preferredDuringSchedulingIgnoredDuringExecution which means that Kubernetes will try to find a Node that has this label to schedule the Pod on, but if it doesn’t it will schedule the Pod on another Node.
The affinity will be ignored once the Pod is scheduled, e.g. Kubernetes will not reschedule the Pod if the Node gets this label removed.
Pod affinity/anti-affinity
Pod affinity is similar to Node affinity, but it affects how Pods are scheduled relative to one-another. For example, we might want to schedule two Pods together on the same Node for some reason. We can do that with Pod affinity.
This is achieved via the spec.affinity.podAffinity property.
For example, this Pod spec will schedule the Pod on the same Node as the Pod that has the service:S1 label:
spec:
  affinity:
    podAffinity:
      requiredDuringSchedulingIgnoredDuringExecution:
        - labelSelector:
            matchExpressions:
              - key: service
                operator: In
                values: [“S1”]
          topologyKey: failure-domain.beta.kubernetes.io/zone
Again, we can have requiredDuringSchedulingIgnoredDuringExecution and preferredDuringSchedulingIgnoredDuringExecution which work the same way as with Node affinity.
Taints and tolerations
Taints and tolerations allow you to mark Nodes (taint them) and only schedule Pods that have a toleration for these taints on such a Node.
This way, you can mark your master node with a taint, so you can only schedule system components on them, or can mark nodes that run special hardware, so that only the workloads that need this hardware are schedules there.
You can add a Taint to a Node via kubectl:
kubectl taint nodes node1 key=value:NoSchedule
and now on this Node we can only schedule Pods that have a Toleration for this Taint.
Tolerations are defined in the spec.toleration field of the Pod.
A toleration for this Taint will look like this:
tolerations:
  - key: "key"
    operator: "Equal"
    value: "value"
    effect: "NoSchedule"
custom schedulers
If none of this constructs gives the flexibility you need when scheduling your Pods you can write and deploy your own scheduler which will work alongside the default Kubernetes scheduler. Actually, you can deploy as many schedulers as you want since Kubernetes supports running multiple schedulers.
In order to utilize your custom scheduler, you need to set the spec.schedulerName field when creating a Pod.
This will tell the Kubernetes scheduler to not schedule the Pod.
For example:
spec:
  schedulerName: my-custom-scheduler
tells Kubernetes that the my-custom-scheduler scheduler will schedule this Pod.
If such scheduler does not exist, this Pod will never get scheduled.
You can find a very simple implementation of a scheduler in Bash here.
MetalLB
MetalLB is a load-balancer implementation for bare metal Kubernetes clusters, using standard routing protocols.
It aims to reduce the gap between bare-metal clusters and ones running in a cloud provider (EKS, AKS, GKE, etc.)
Bare-metal clusters that do not have the same LB-provisioning capabilities as the ones running on a cloud provider. MetalLB aims to correct that and bring the same user experience when provisioning and configuring a Load Balancer.
Keepalived
Keepalived is a routing software written in C. The main goal of this project is to provide simple and robust facilities for load-balancing and high-availability to Linux system and Linux based infrastructures. Loadbalancing framework relies on a well-known and widely used Linux Virtual Server (IPVS) kernel module providing Layer4 load-balancing. Keepalived implements a set of checkers to dynamically and adaptively maintain and manage a load-balanced server pool according to their health.
Kubelived is an open-source project that uses Keepalived for providing a cheap way to have highly-available Kubernetes control planes.
It works by deploying static pods that run Keepalived and assign the VIP(Virtual IP address) to one of the master nodes. It then takes care that this VIP will always be assigned to a healthy node that will serve as load balancer for the whole cluster.
Summary
This is all for part seven.
Just one more layer left until we crash the whole iceberg!
The series finishes with Part 8.
If you don’t want to miss it, you can follow me on Twitter or LinkedIn.