Demystifying the Kubernetes Iceberg: Part 4
Categories:
14 minute read
This is the fourth article of the “Demystifying the Kubernetes Iceberg” series. My goal for this series is to explain all concepts mentioned in the “Kubernetes Iceberg” diagram by Flant.
This is the iceberg:
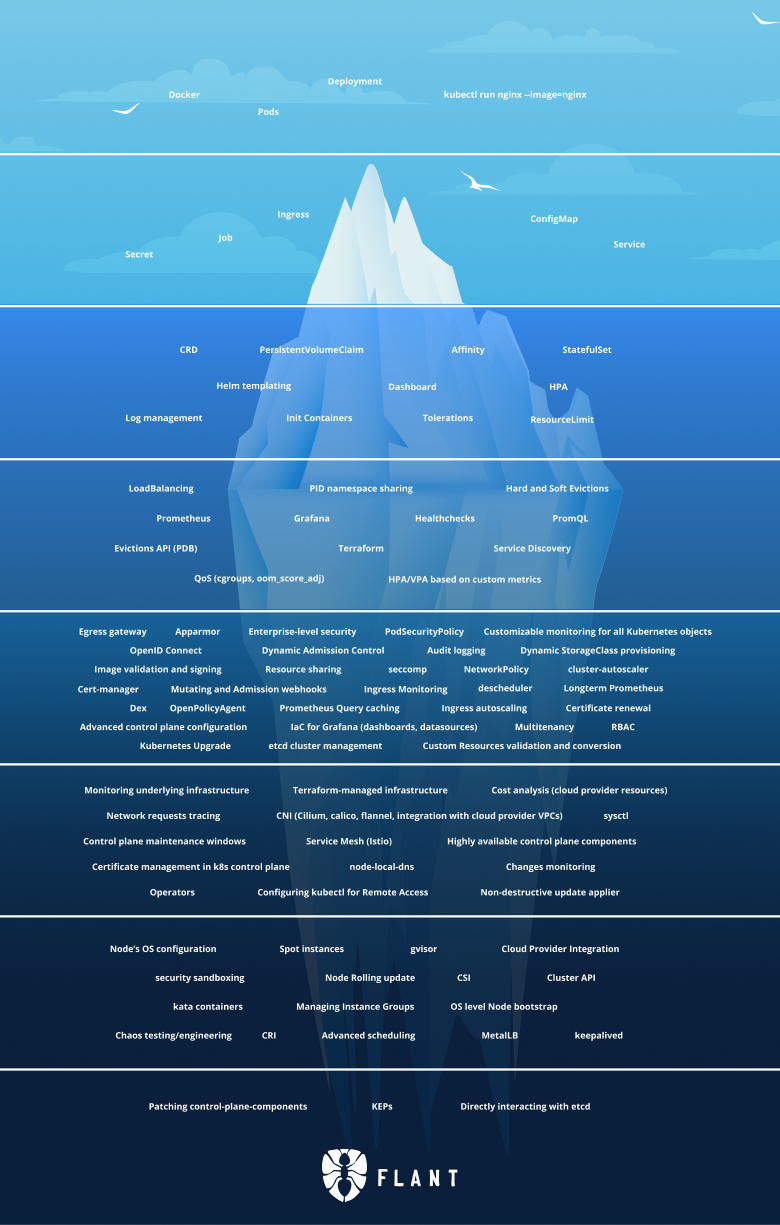
In this article, we will dive into Tier 5 of the iceberg. Since this tier is huge and would produce a really long article, I decided to split it in two parts.
The first part (this article) will focus on all the security related concepts in this tier, the second one will focus on everything else.
You can find the others article:
I will publish one article each week until I complete the whole iceberg.
Tier 5, Part 1 - Security
RBAC
RBAC stands for Role-Based Access Control.
It is a way of doing authorization by having a set of Roles. Each Role is assigned a set of Permissions (ability to do something). Each user in the system is assigned a set of Roles. In the end, the Roles a user has assigned govern how much they can do in the system.
The permissions assigned to the roles contain a Kubernetes object and a verb.
For example, some Roles can be allowed to List Deployment but not to Create Deployments or Update Deployments.
RBAC is the primary way for Kubernetes to do authorization.
RBAC in Kubernetes can be configured dynamically through 4 API objects - Role, ClusterRole, RoleBinding, and ClusterRoleBinding.
A sample RBAC scheme in an organization can look like this:
| Role | Get/List Deployments | Create/Update Deployments | Create RoleBinding |
|---|---|---|---|
| Developer | ✅ | ❌ | ❌ |
| DevOps | ✅ | ✅ | ❌ |
| Admin | ✅ | ✅ | ✅ |
A user with the Developer role can view the Deployments into the cluster, but they cannot edit them or create new ones.
The DevOps role can not only view the Deployments but also create new ones and update existing ones.
However, neither the DevOps nor the Developer can create new RoleBindings (which would mean assigning new roles to users, hence giving more permissions to some users).
This action can only be performed by the Admin group.
You can read about RBAC in Kubernetes here.
RBAC is good because it gives you a lot of flexibility when assigning Roles and Permissions. However, RBAC alone may not be enough to protect your cluster. Continue reading for more advanced security techniques used in Kubernetes.
PodSecurityPolicy
PodSecurityPolicy is a (deprecated) Kubernetes object that enabled (some sort of) fine-grained authorization of pod creation and updates.
When creating a PodSecurityPolicy, you can specify some set of predefined rules that will be enforced for your Pod objects.
For example, the following PodSecurityPolicy denies Pods that run privileged containers:
apiVersion: policy/v1beta1
kind: PodSecurityPolicy
metadata:
  name: example
spec:
  privileged: false # Don't allow privileged pods!
  # The rest fills in some required fields.
  seLinux:
    rule: RunAsAny
  supplementalGroups:
    rule: RunAsAny
  runAsUser:
    rule: RunAsAny
  fsGroup:
    rule: RunAsAny
  volumes:
    - "*"
When we try to create a Pod that defies this rule, we will get an error similar to this one:
Error from server (Forbidden): error when creating "STDIN": pods "privileged" is forbidden: unable to validate against any pod security policy: [spec.containers[0].securityContext.privileged: Invalid value: true: Privileged containers are not allowed]
These rules are enforced by an admission controller that needs to be activated before we can create and enforce any PodSecurityPolicies.
For the full spec of available rules, check out the docs.
Deprecation notice
PodSecurityPolicies are deprecated since Kubernetes v1.21 and will be removed in v1.25.
Those using PodSecurityPolicies should migrate to [PodSecurityStandards](https://kubernetes.io/docs/concepts/security/pod-security-standards/) which is a new and more flexible alternative to PodSecurityPolicies
Audit logging
Audit logging is a special kind of logging that aims to show who accessed what in a system. Audit logs are treated very cautiously, usually outsourced to an external system, so that even if something fails with our application, the audit logs are saved and can be viewed. This also prevents an attacker that got into our system from messing up with our audit logs and deleting its trails.
Kubernetes provides audit logging functionality that logs every access to the given Kubernetes resources. One could configure audit logging at a different level for the different kinds of resources. For example, you could want to log absolutely everything when it comes to the critical resources but log less information when it comes to non-critical resources.
Audit logging is configured via the Policy object in the audit.k8s.io APi group.
For example, this Policy object configures the api server to log every request and response when it comes to interaction with Pods and to log nothing when it comes to interaction with the "controller-leader" ConfigMap:
apiVersion: audit.k8s.io/v1
kind: Policy
rules:
  - level: RequestResponse
    resources:
      - group: ""
        resources: ["pods"]
  - level: None
    resources:
      - group: ""
        resources: ["configmaps"]
        resourceNames: ["controller-leader"]
Audit logging backends
The Kube API server supports two audit logging backends.
The first one is file-based.
Using it means that the API server will output all audit logs to a file.
It is configured via the --audit-log-path flag.
The second supported backend is a webhooks-based one.
Using it means that the API server will call an external API to save the audit logs.
It is configured via the --audit-webhook-config-file flag.
The value of the flag should be the name of a kubeconfig file that specifies the location of the remote server and the credentials to access it.
The remote server should be a form of the Kubernetes API.
Image validation and signing
Signing container images means that the contents of a particular container image version are cryptographically signed, and they can be later verified. This increases the trust in downloading container images from the internet because you have a way to verify that what you have downloaded is exactly what you expect.
This can be done manually, but people often automate it and implement the workflow in their CI pipelines.
The most popular project that enables this workflow is cosign.
seccomp
seccomp (short for secure computing mode) is a Linux kernel utility that, when activated for a process, restricts the process to making any system calls (except exit(), sigreturn(), read(), and write() to already open file descriptors).
Kubernetes supports enabling seccomp profiles to the containers running in the Pods.
This is done via the spec.securityContext.seccompProfile in the Pod spec.
There are different seccomp profiles that provide various levels of restriction. You don’t want to allow a container to do many syscalls, but you also don’t want to obstruct the container from doing its job by restricting it from making the necessary syscalls. That is why it’s essential to craft your custom seccomp profiles that give a container permission to do only the syscalls that it is supposed to be doing.
AppArmor
AppArmor is a Linux application security system. It is deployed as a Kernel module, and most Linux distributions ship with AppArmor enabled.
It is used by enabling certain profiles that protect your OS from known harmful and malicious behavior of applications.
It is also integrated into Kubernetes. You can enable it with kubelet flags and assign AppArmor profiles to containers via annotations.
For example, creating a Pod with this annotation will enable the runtime/default AppArmor profile for the specified containers:
container.apparmor.security.beta.kubernetes.io/<container_name>: runtime/default
You can also register custom profiles. This profile will enable file writes for all containers that have it assigned to them:
#include <tunables/global>

profile k8s-apparmor-example-deny-write flags=(attach_disconnected) {
  #include <abstractions/base>

  file,

  # Deny all file writes.
  deny /** w,
}
You can assign it to a container via this annotation:
container.apparmor.security.beta.kubernetes.io/<container_name>: k8s-apparmor-example-deny-write
This is the same annotation as the previous one. We just changed the profile name to match the name of our custom profile.
If we create a container with this AppArmor profile and try to write to a file, we will get the following error:
$ touch /tmp/test
touch: /tmp/test: Permission denied
error: error executing remote command: command terminated with non-zero exit code: Error executing in Docker Container: 1
AppArmor has been a Kubernetes feature since v1.4, but it’s still in beta. That is why it is configured via annotations and not first-class spec fields.
NetworkPolicy
NetworkPolicy is a Kubernetes resource that controls the allowed ingress and egress traffic from and to a Pod.
NetworkPolicy is just a configuration resource.
It defines the allowed destinations but does not enforce anything.
To enforce the NetworkPolicies, you need to install a network plugin (also called CNI plugin).
Applying a NetworkPolicy without installing a network plugin will have no effect.
When creating a NetworkPolicy, you define all allowed ingress and egress destinations.
The network plugin will block every destination that is not in this allowlist.
NetworkPolicies are additive.
If you have two network policies for the same Pod, the allowlist for this Pod is the sum of the allowlist of the two policies.
Therefore, if you have an allow-all NetworkPolicy for a Pod, all other policies for this Pod will be useless.
Here is an example policy applied to all pods with the label role: db.
It specifies that these Pods are allowed only ingress connections from pods with the label role: frontend and from the CIDR IP block 172.17.0.0/16 except for 172.17.1.0/24:
apiVersion: networking.k8s.io/v1
kind: NetworkPolicy
metadata:
  name: test-network-policy
  namespace: default
spec:
  podSelector:
    matchLabels:
      role: db
  policyTypes:
    - Ingress
  ingress:
    - from:
        - ipBlock:
            cidr: 172.17.0.0/16
            except:
              - 172.17.1.0/24
        - podSelector:
            matchLabels:
              role: frontend
Mutating and Admission webhooks
Mutating and Admission webhooks are powerful instruments. Admission webhooks allow you to implement dynamic admission control. Mutating webhooks enable you to implement dynamic remediation of resources being created/updated.
Admission webhooks
Admission webhooks are webhooks that determine whether a create/update/delete operation for a resource should be allowed.
They are called by the ValidatingAdmissionWebhook admission controller.
So although admission controllers themselves are not extendible, this particular admission controller allows you to deploy a webhook which will be called by Kubernetes, thus adding extensibility to the admission workflow.
An admission webhook is just that, a webhook. It expects a specific request and should return a proper response. In between, you can implement whatever logic you want. This way, you can have full control over what resources are deployed into your cluster.
Mutating webhooks
Mutating webhooks are webhooks that mutate a resource that is being applied to the API server.
They are called by the ValidatingAdmissionWebhook admission controller.
This can be useful to enforce a certain property of your resources.
For example, if you want to be sure that all your Pods will have their spec.securityContext.runAsUser field equal to 1000, you can have a mutating webhook that will change this field to 1000 each time a Pod is applied.
NOTE: This example will only work for Pods that are applied directly to the API server, it will not work for ones owned by Deployments or ReplicaSets, because the Deployment controller will be reconciling the Pods not stop and trying to set the field to its original value.
If you want to achieve that, you will need to create separate mutating webhook for Deployments, ReplicaSets, etc.
Dynamic Admission Control
By default, Kubernetes ships with so-called admission controllers. These are controllers that control the interaction with the Kubernetes resources (create/update/delete, etc.).
More specifically, they may block the creation/update/deletion of a given resource if that resource violates some rule according to the controller.
These controllers are in-tree. Their codebase lives together with the Kubernetes codebase. They are compiled along with Kubernetes and called natively. If you want to add an admission controller, you need to change the Kubernetes source code, rebuild it and deploy your custom Kubernetes version.
Admission controllers can be enabled or disabled based on your preference. For the complete list of available admission controllers, check the docs.
Open Policy Agent
Open Policy Agent or OPA is a general-purpose policy engine. It evaluates JSON input against a set of Rego policies and returns a JSON output.
A straightforward Rego policy:
package kubernetes

default allow = false

allow = true {
    input.author.name = "Anton Sankov"
}
A simple JSON input:
{
  "author": {
    "name": "Anton Sankov"
  }
}
The output of this JSON input evaluated against this policy:
{
  "allow": true
}
It is general-purpose; therefore, it can be used for absolutely everything.
In the Kubernetes ecosystem, it is widely used for security, being the backbone of projects like Gatekeeper that provide customizable validating webhook. In this case, the admission policies are written in Rego, and the Kubernetes object being evaluated is represented as JSON.
Bonus: Gatekeeper
The Gatekeeper project is not included in the iceberg, but I think it’s an important part of the Kubernetes ecosystem and steps on some concepts explained here, so I will include it in the article nonetheless.
Gatekeeper is a customizable admission webhooks. It uses OPA under the hood and implement and admission webhook, so it can be used to implement dynamic admission control.
Since it uses OPA, the policies are written in Rego. Gatekeeper is responsible for registering the webhook that Kubernetes will call when someone interacts with the resources. These resource will be then passed to the policy as arguments, so that you can make decisions based on the resource field.
Policies are stored as CRD(Custom Resource Definition). This CRD is also registered by Gatekeeper, to allow the users to interact with policies as first-class resources in a Kubernetes-native way.
To register a simple policy that will be evaluated by Gatekeeper you need to create these two resources:
First, a ConstraintTemplate that specifies the Rego policy and the expected arguments:
apiVersion: templates.gatekeeper.sh/v1
kind: ConstraintTemplate
metadata:
  name: k8srequiredlabels
spec:
  crd:
    spec:
      names:
        kind: K8sRequiredLabels
      validation:
        # Schema for the `parameters` field
        openAPIV3Schema:
          type: object
          properties:
            labels:
              type: array
              items:
                type: string
  targets:
    - target: admission.k8s.gatekeeper.sh
      rego: |
        package k8srequiredlabels

        violation[{"msg": msg, "details": {"missing_labels": missing}}] {
          provided := {label | input.review.object.metadata.labels[label]}
          required := {label | label := input.parameters.labels[_]}
          missing := required - provided
          count(missing) > 0
          msg := sprintf("you must provide labels: %v", [missing])
        }
then an instance of the ConstraintTemplate (in this case K8sRequiredLabels) to tell Gatekeeper when to invoke this policy and with what arguments:
apiVersion: constraints.gatekeeper.sh/v1beta1
kind: K8sRequiredLabels
metadata:
  name: deployments-must-have-gk
spec:
  match:
    kinds:
      - apiGroups: ["*"]
        kinds: [“Deployments"]
  parameters:
    labels: ["gatekeeper"]
If you want to learn more about using Gatekeeper and OPA check out my article about Securing Kubernetes with Open Policy Agent.
OpenID Connect
OpenID Connect is a simple identity layer on top of the OAuth 2.0 protocol. It allows Clients to verify the identity of the End-User based on the authentication performed by an Authorization Server, as well as to obtain basic profile information about the End-User in an interoperable and REST-like manner.
Dex
Dex is an OpenID Connect provider. It is an open-source project, currently a CNCF sandbox.
It provides a single interface for multiple authentication providers.
In the context of Kubernetes, Dex can be used as an authenticator plugin. This means that users managed by other identity providers can automatically get some access to a Kubernetes cluster via Dex.
This is useful for bigger organizations, where users are managed in a centralized place like Active Directory. An adapter like Dex could enable users being added to a company’s AD (or other IDP) to automatically get access to all the relevant Kubernetes clusters that their other team members also have access to.
Enterprise-level security
Enterprise-level security is a broad term and can mean a lot of things. Every concept in this article can be part of an “enterprise-level security.”
An enterprise using Kubernetes and wanting to secure it in an “enterprise” way needs to use at least half of the things described in this article.
At a minimum, they need to use RBAC to ensure that everyone has access only to the resource they need to have. Ideally, that will be integrated with their AD provider using an OpenID Connect provider like Dex. Then, they need to enable audit logging so that if someone manages to escalate privileges or if RBAC is configured wrong, there is a reliable trace for that.
Another good additional layer of security would be to limit what processes the Pods can run via tools like AppArmor and seccomp and what network connections they can do via PodSecurityPolicies.
Last but not least, they could implement Dynamic admission control via mutating and admission webhooks, using tools like OPA and Gatekeeper.
Summary
This is all for part four.
In this article, we managed to go over many of the main Kubernetes security concepts. Security is a really important topic in today’s world and I believe that every Kubernetes practitioner should know at least a little bit of security. I hope that this article can be a good starting point of someone getting into Kubernetes security.
The series continues with Part 5.
If you don’t want to miss an article, you can follow me on Twitter or LinkedIn.