Demystifying the Kubernetes Iceberg: Part 2
Categories:
11 minute read
This is the second article of the “Demystifying the Kubernetes Iceberg” series. My goal for this series is to explain all concepts mentioned in the “Kubernetes Iceberg” meme by Flant.
You can find the first article here. I will publish one article each week until I complete the whole iceberg.
And this is the iceberg itself:
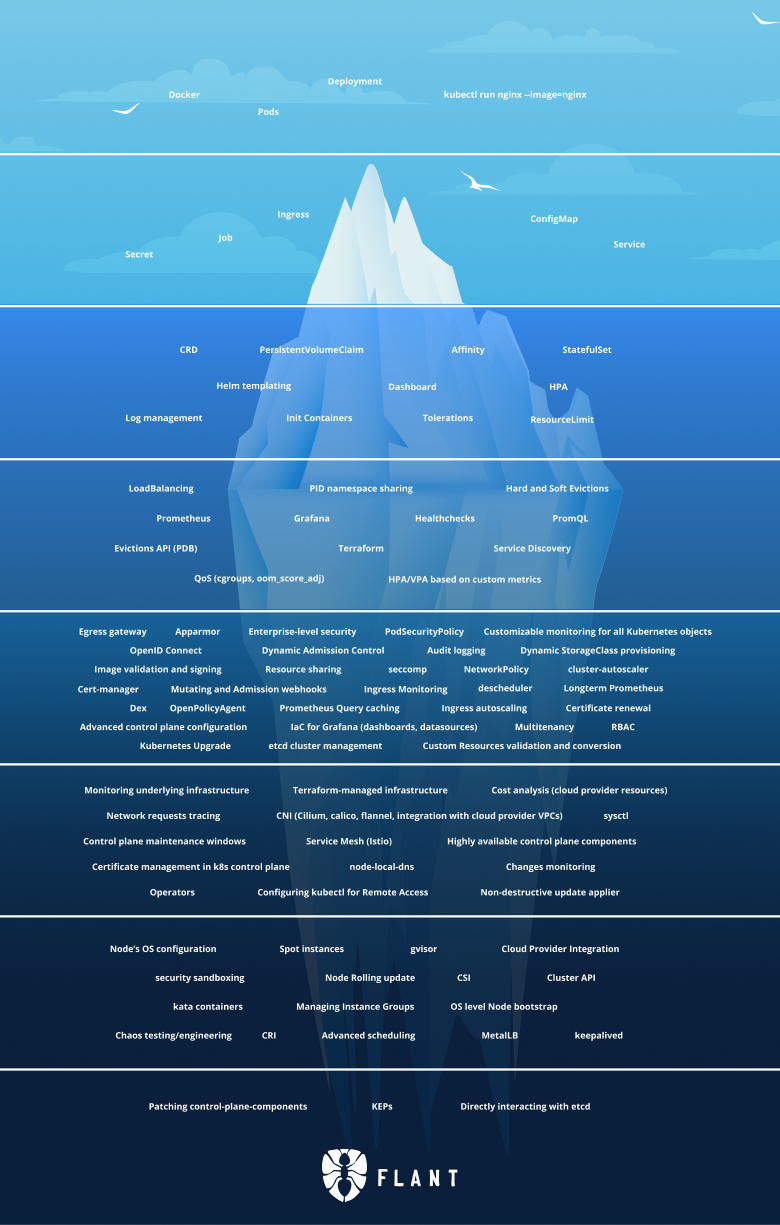
In this article, I focus on Tier 3 of the Iceberg. Let’s go!
Tier 3
CRD
CRD or a Custom Resource Definition is a way to extend the Kubernetes API by adding your own resource.
You can define what fields it has, what types they are, whether any of them is required, their default values, etc.
Kubernetes will register CRUD API endpoints for this resource (get, list, watch, delete, etc.) and you can start treating this resource as any of the Kubernetes build-in ones (Pods, Deployments, etc.).
This includes:
- using
kubectltogetordescribethis resource - creating instances of this resource via YAML files and
kubectl apply - calling the REST APIs for this resource directly, e.g.
curl <kube_url>/api/<version>/<crd_name>
If you want to have an additional logic around your resource, e.g. trigger some actions when someone creates an instance of our CRD, you can do that by implementing an operator (more on that in later posts).
You can check out my presentation from ISTA 2021 about how to use CRD to build a CRUD application backend.
PersistentVolumeClaim
A PersistentVolumeClaim is a request for storage by a user/resource.
The given storage is taken from a PersistentVolume, which is an abstract Kubernetes object that represents some storage.
There are different storage classes, that represent the different implementations of storage that can be used by Kubernetes.
The storage class is specified in the PersistentVolume spec.
Once a PersistentVolumeClaim is created, Kubernetes will try to utilize the storage by provisioning the requested amount to the requester.
The PersistentVolumeClaim also specified the access mode to the storage (e.g. ReadWriteOnce, ReadOnlyMany, or ReadWriteMany).
StatefulSet
A StatefulSet is a Kubernetes resource the represents a workload.
It is similar to a Deployment - it manages a set of Pods based on a Pod spec.
The specific thing about a StatefulSet is that manages stateful applications (hence the name).
It is useful for situations where you want:
- stable, unique network identifiers
- stable, persistent storage
- ordered, graceful deployment and scaling
- ordered, automatic rolling updates
Helm templating
Helm is a templating engine that allows you to write reusable Kubernetes templates.
For example, if you have a Pod that you deploy to three environments and you want to set a different label for each environment, you don’t need to copy-paste the Pod YAML three times and just change the value of the label.
You can use Helm to extract the different fields into variables, which later get templated, and reuse all the parts that don’t differ between environments.
For example, this is a template for a Pod with a hardcoded environment label:
apiVersion: v1
kind: Pod
metadata:
  name: busybox-sleep
  labels:
    environment: production
spec:
  containers:
    - name: busybox
      image: busybox
      args:
        - sleep
        - "1000000"
If we want to convert this to a Helm template all we need to do is:
apiVersion: v1
kind: Pod
metadata:
  name: busybox-sleep
  labels:
    environment: {{ .Values.environment }}
spec:
  containers:
    - name: busybox
      image: busybox
      args:
        - sleep
        - "1000000"
Now the value of the environment label comes from the .Values.environment variable.
This variable comes from a so-called values file.
This is a YAML in which we specify the values of our variables.
By using different values files we can output different resource specs with different values.
For example, we can have one values files for each of our environments:
# dev.yaml
environment: dev
# staging.yaml
environment: staging
# production.yaml
environment: production
Using the template shown above with the dev.yaml values file will output this spec:
apiVersion: v1
kind: Pod
metadata:
  name: busybox-sleep
  labels:
    environment: dev
spec:
  containers:
    - name: busybox
      image: busybox
      args:
        - sleep
        - "1000000"
While using it with the production.yaml values file will output this one:
apiVersion: v1
kind: Pod
metadata:
  name: busybox-sleep
  labels:
    environment: production
spec:
  containers:
    - name: busybox
      image: busybox
      args:
        - sleep
        - "1000000"
Package manager
Apart from a templating engine, Helm is also a package manager for Kubernetes.
You can use it to “package” your Helm charts (a Helm chart == a bunch of templates) and publish them into a repository.
Once you do that, everyone can install you chart into their cluster via the helm install command and use Helm to manage the lifecycle of that chart.
Dashboard
A dashboard is a type of graphical user interface which provides visual information about some metrics in a given system.
A Kubernetes dashboard would show the number of Pods, Deployment, Services, Nodes, etc.
There is an “official” dashboard provided by Kubernetes, which you can install in your cluster. It is a web-based one, that shows you all the resources in your cluster and a lot of other useful information. It looks like this:
To install it, you need to apply some Kubernetes resource and expose them outside of the cluster (so that you can open the web page in your browser).
More information about the dashboard, and how to install it you can find here.
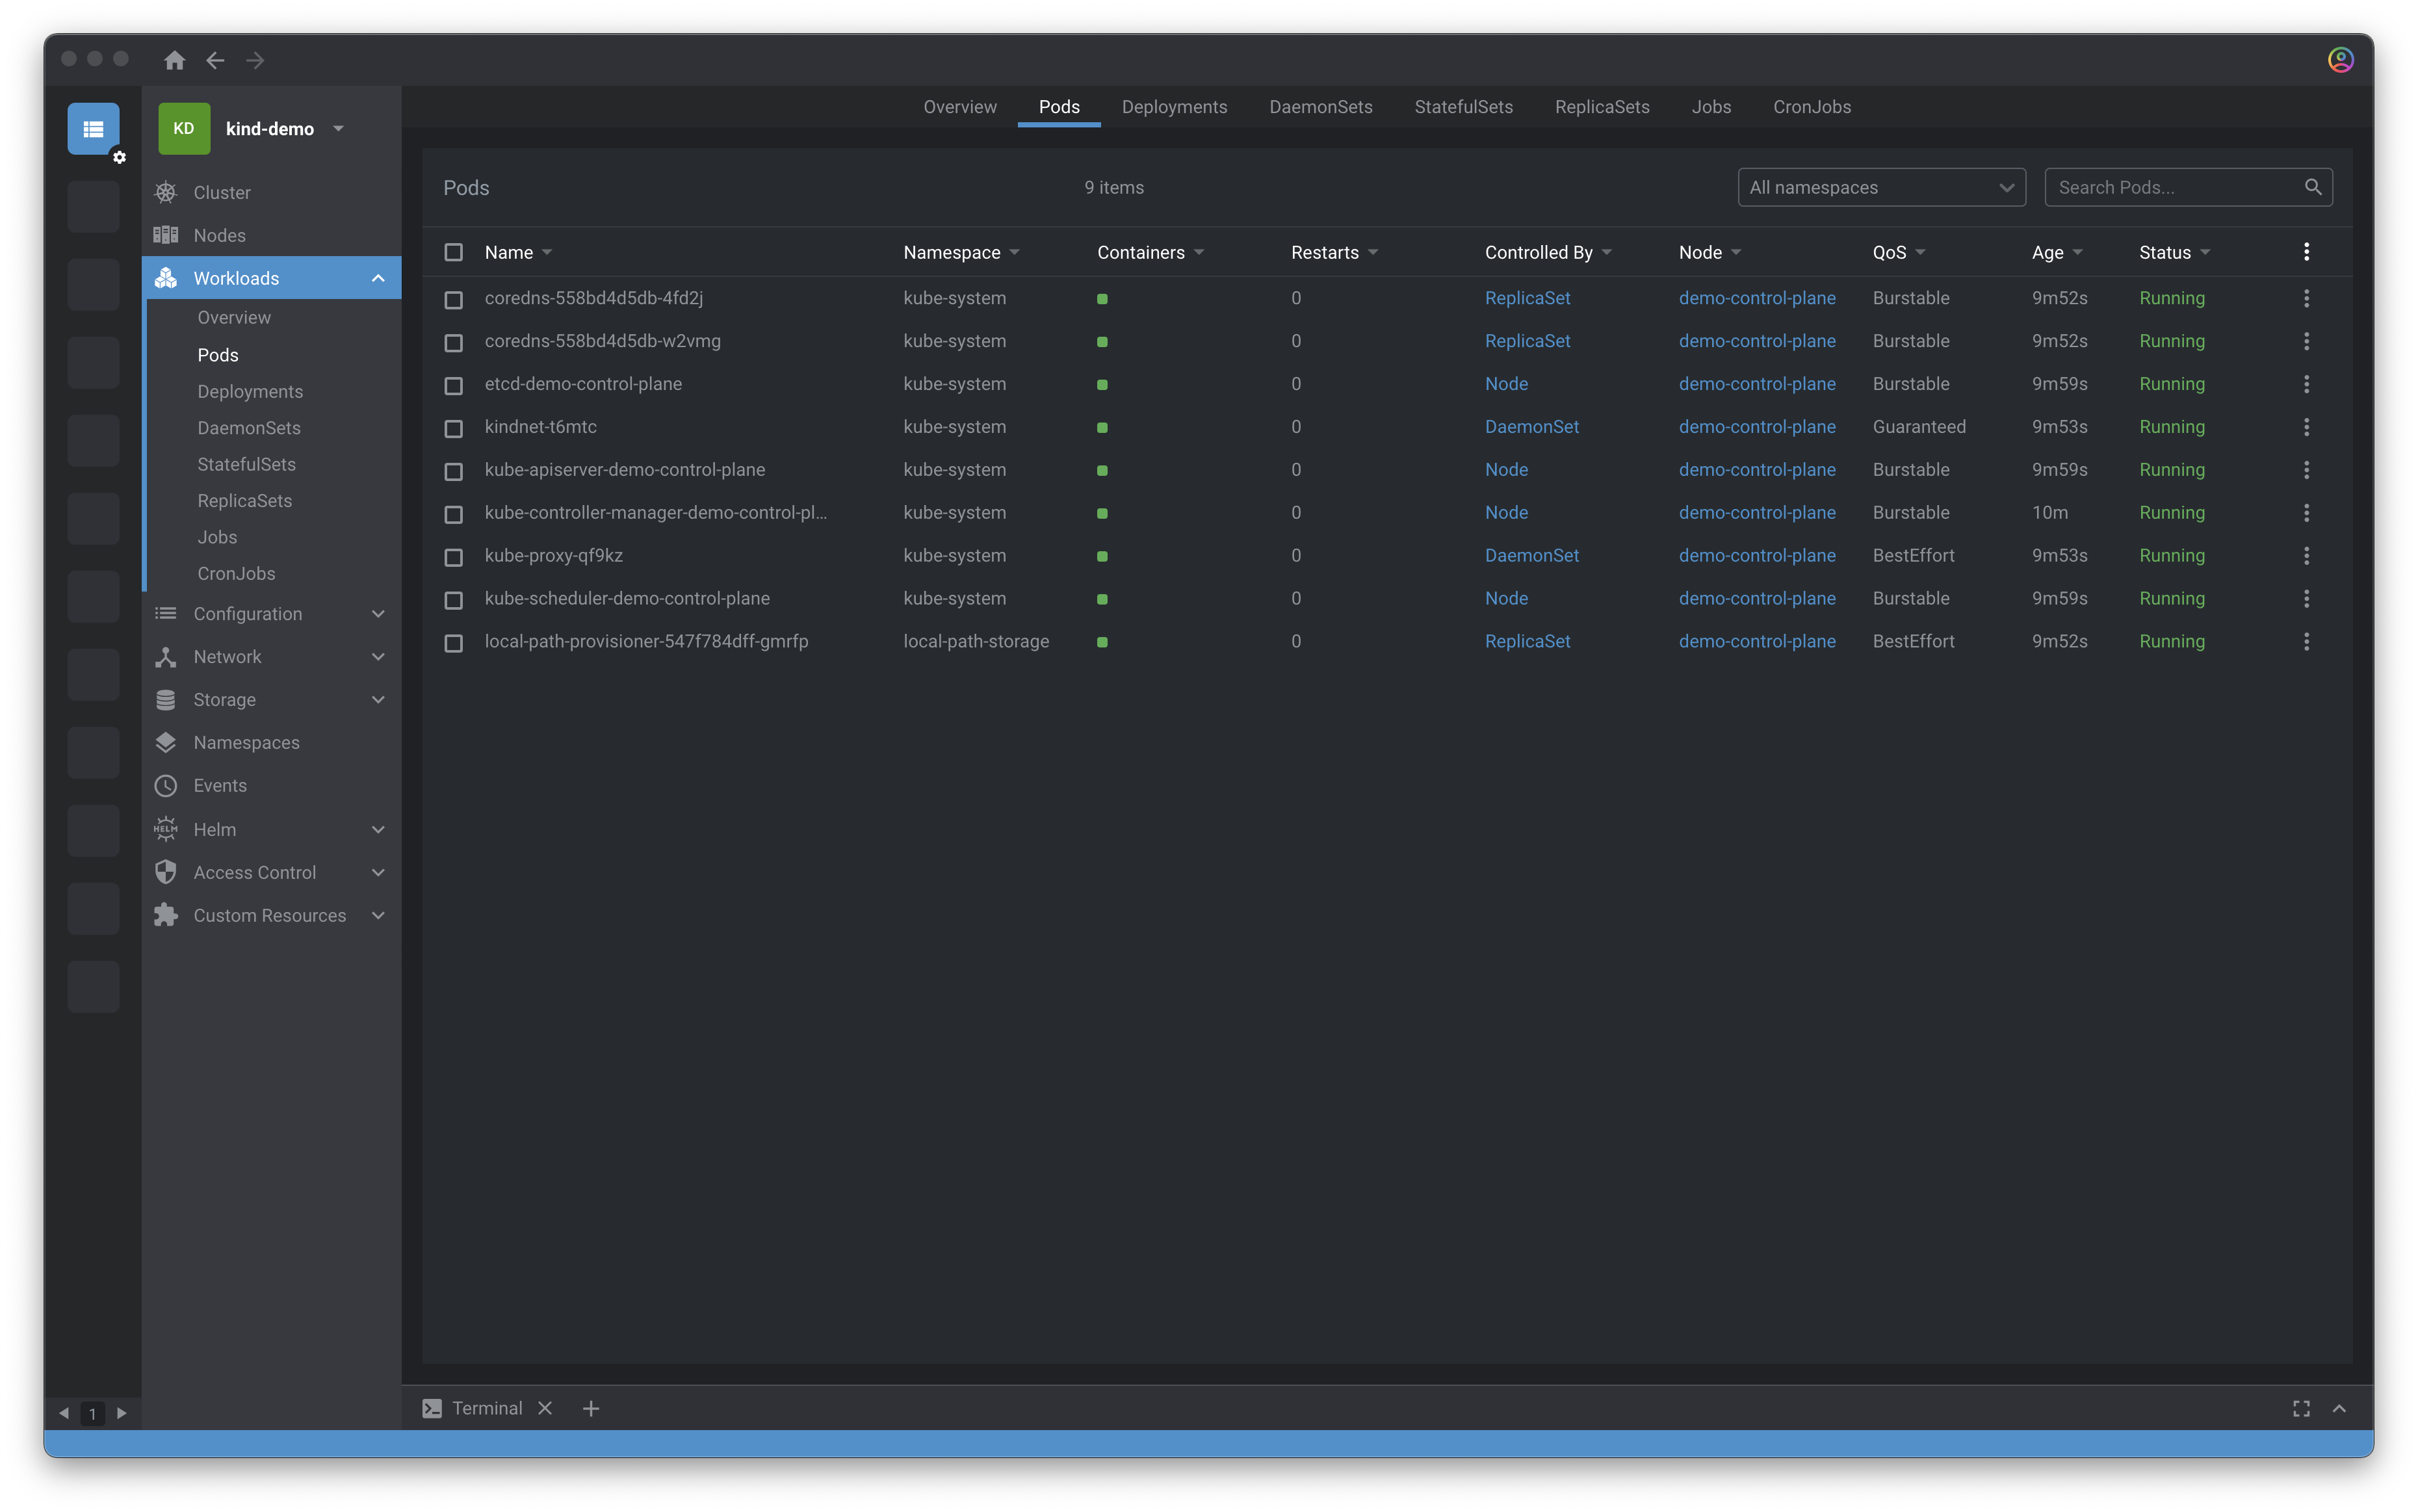
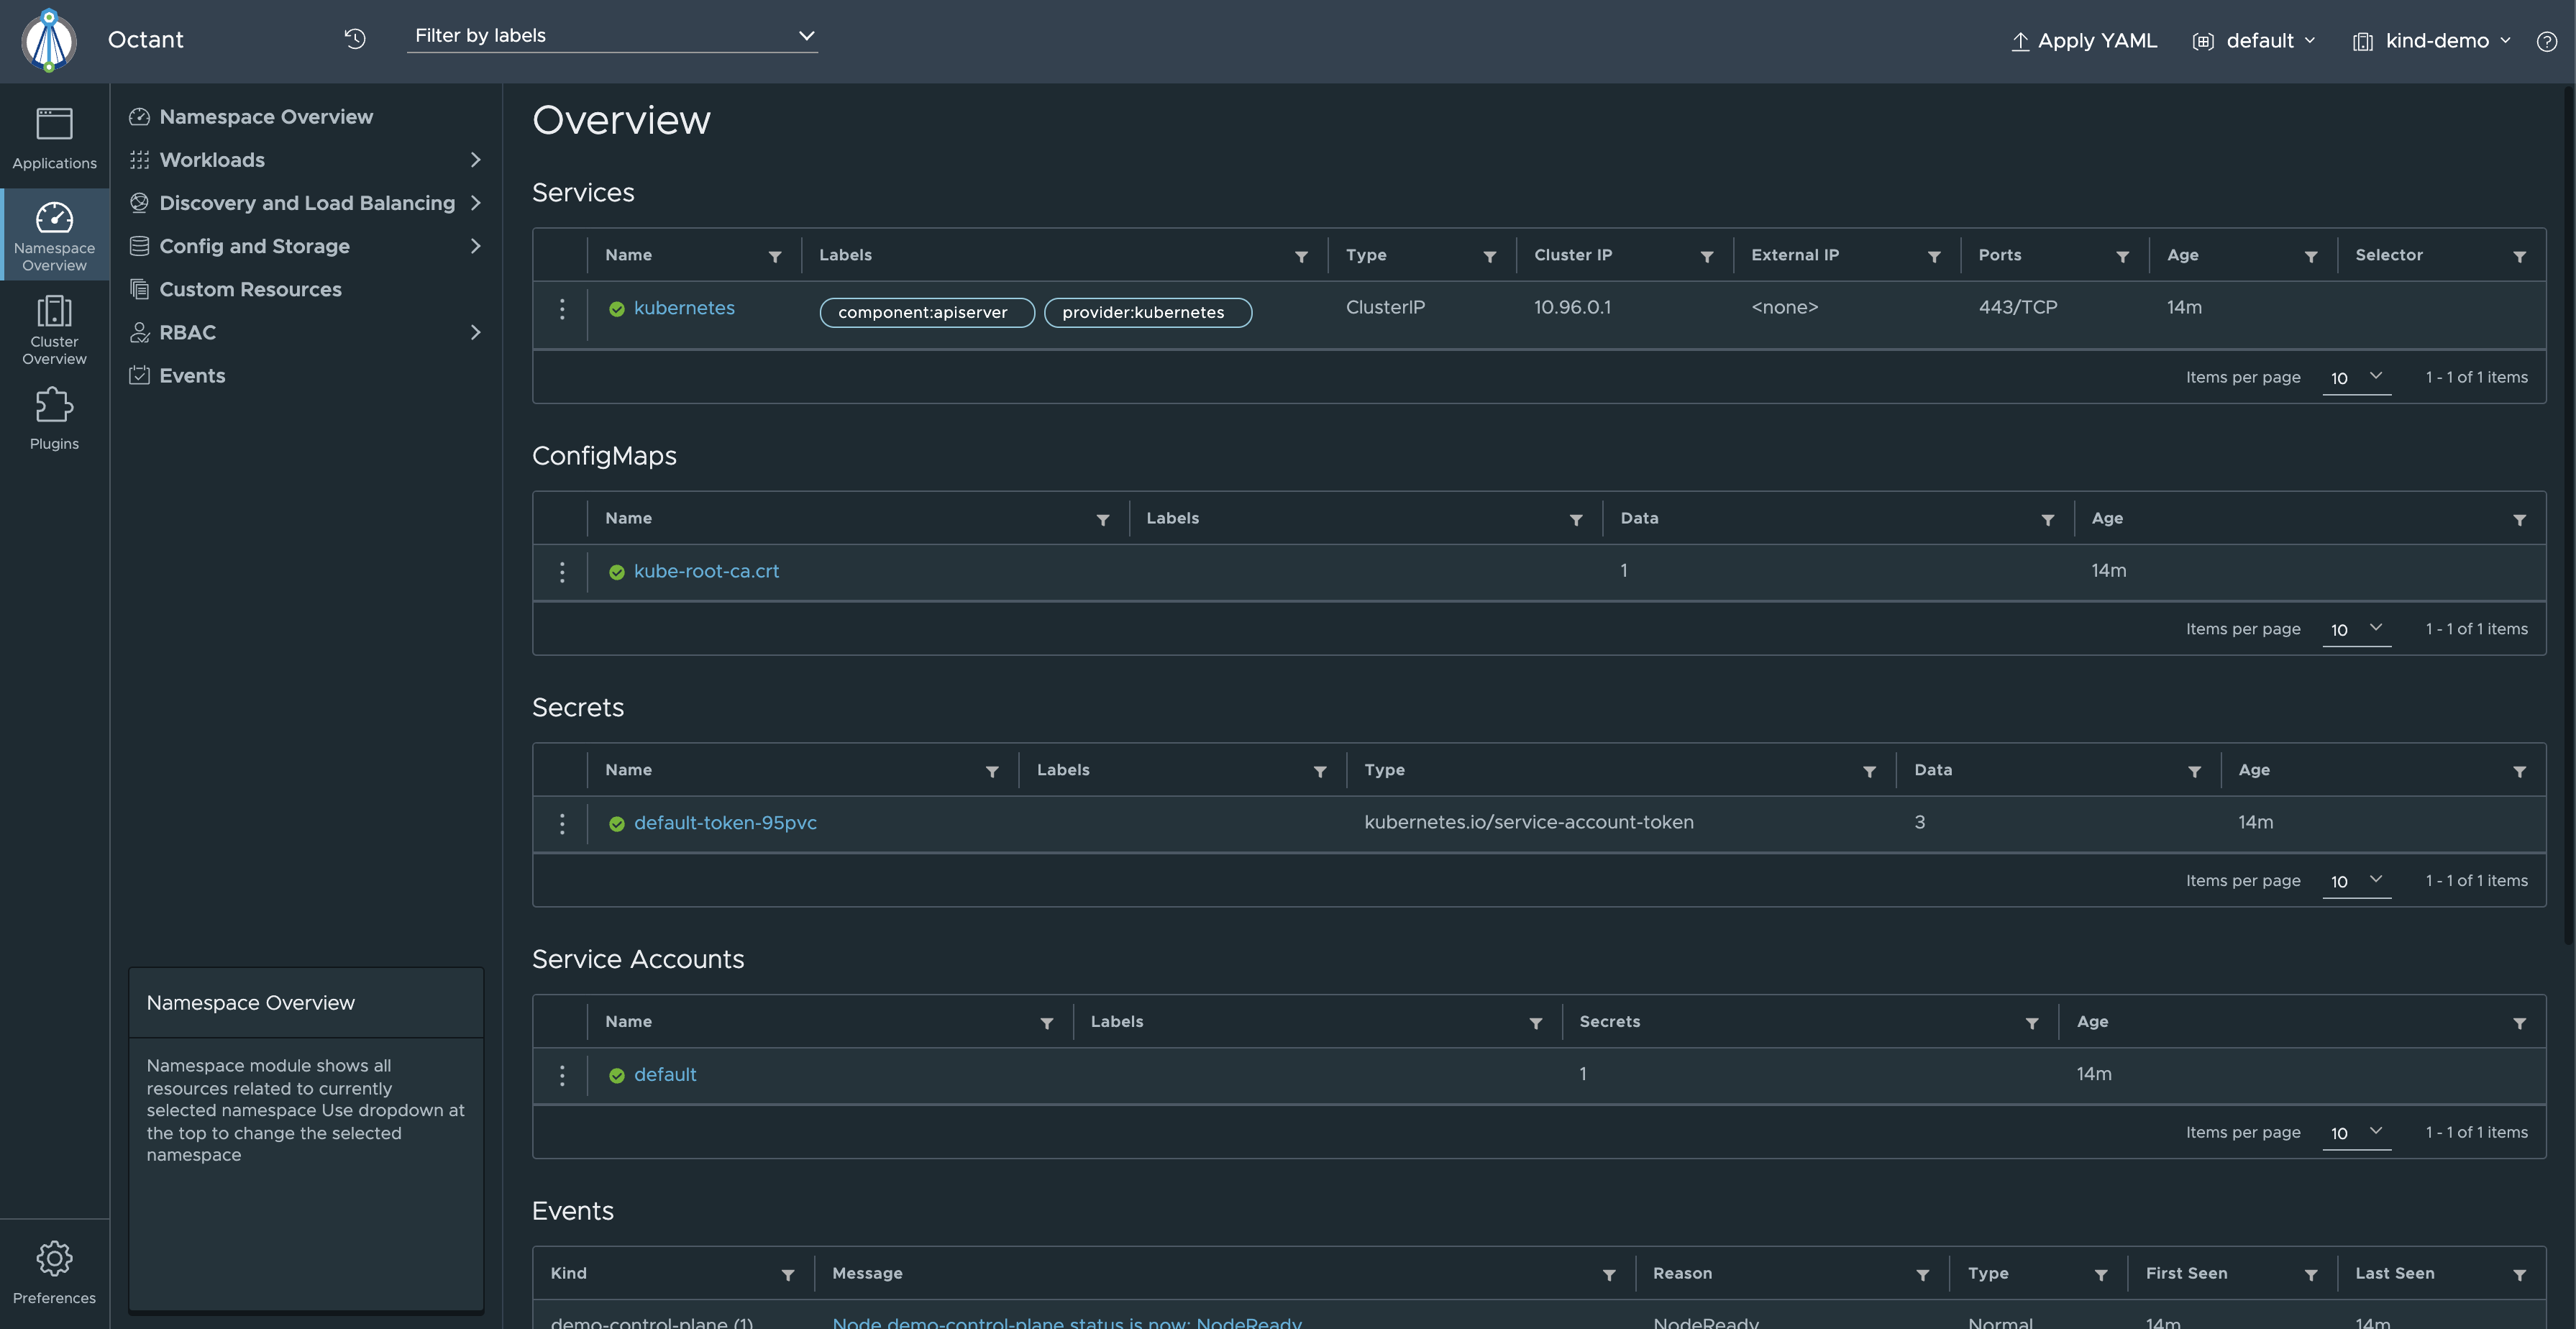
Apart from this “official” dashboard there are other open-source projects which you can use to get the same information. They are called Kubernetes IDEs and they provide similar experience to the Kubernetes dashboard.
Some of them are:
K9s
Open-source CLI-based Kubernetes IDE. Connects to the cluster(s) defined in your kubeconfig file.
Good for users that prefer the terminal. Supports many “power-user” workflows.

Lens
Open-source Desktop application based on Electron.
Build by the Lens team, now part of Mirantis. Supports adding multiple Kubernetes clusters and switching between them.
Octant
Open-source Web-based dashboard, by VMware.
Can be run locally or deployed into a remote cluster and accessed via the browser.
HPA
HPA or HorizontalPodAutoscaler is a Kube API server feature that allows you to scale workloads horizontally based on metrics.
Horizontal scaling means that we are increasing the count of the running workloads (e.g. go from 3 Pods to 5). This is different than vertical scaling, which means increasing the resources on a given workloads (e.g. increase the CPU and memory provided to a Pod).
The HorizontalPodAutoscaler is created as a Kubernetes resource, part of the autoscaling API group.
It defines the workloads selector and the metrics based on which we’ll do the scaling.
Once on every interval (that is defined by the user, with a default value) the Kube API server will query the metrics of the Pods, and based on the conditions we defined will decide whether it needs to scale the workloads up (more pods) or down (less pods).
There is always a min and max Pod count, e.g. never go below a certain number of Pods, and never go above a certain number of Pods.
There are some default metrics that are defined by Kubernetes that can be used with HorizontalPodAutoscaler out of the box, but there is also a capability to use it with custom metrics, defined by you (more on that in the next article).
Log management
When running containers, they are usually configured to output their logs to stdout and stderr (at least, this is the best practice).
If the container dies (because of an issue or because we are upgrading the application), the logs will be lost (because the two output streams will go away with the container).
This means that we need to plug in something else that will read these logs and store them permanently in a way not tied to the container lifecycle.
Fortunately, Kubernetes has a solution for this. It supports a lot of log drivers, which can be integrated with your application logging (without having custom logic in your app). These drivers will read data from the container output streams and send the logs to a centralized system like logz.io, Splunk, or Loki. Once there your logs are safe and they will not be lost, even if a container dies. Also, a lot of these systems provide an easy way to aggregate logs from different services and search through the logs based on a keyword, or field-based search (if you have structured logging).
Init containers
Init containers are specialized containers that run before app containers in a Pod.
They can be used to execute some actions in the Pod to prepare the Pod for the execution of the main container.
You can have multiple init containers in a Pod. Kubernetes will run all of them before running the main container.
All init containers need to exit successfully for Kubernetes to start the main container. If an init container fails, Kubernetes will restart it
You can specify init containers via the spec.initContainers field in the Pod spec.
apiVersion: v1
kind: Pod
metadata:
  name: my-app-pod
  labels:
    app: my-app
spec:
  containers:
    - name: my-app-container
      image: busybox
      command: ["sh", "-c", "echo The app is running! && sleep 3600"]
  initContainers:
    - name: my-app-first-init-container
      image: busybox
      # print "Hello from init container 1" 5 times then exit successfully
      command:
        [
          "sh",
          "-c",
          "for i in {1..5}; do echo 'Hello from init container 1'; done; exit 0",
        ]
    - name: my-app-second-init-container
      image: busybox
      # print "Hello from init container 1" 10 times then exit successfully
      command:
        [
          "sh",
          "-c",
          "for i in {1..10}; do echo 'Hello from init container 2'; done; exit 0",
        ]
Affinity
Affinity is the capability to specify the preferred nodes for a workload, e.g. a workload has affinity towards a node.
You can do that by setting labels on the Nodes, and then setting the affinity towards these labels in the Pod spec of the workloads.
Taints and Tolerations
Taints and Tolerations are the opposite of Affinity. Whilst the affinity defines the preferred Nodes for a Pod, Taints and Tolerations define the opposite - Nodes, where the Pods should NOT be scheduled on.
Each Node can have multiple taints. In order for a Pod to be able to be scheduled on a Node, a Pod must have Tolerations for all the Taints on that Node.
Effects
Taints/Tolerations can have different effects, which mean different things:
NoSchedule- if a Pod does not have a matching Toleration, Kubernetes will not schedule it on that Node. The Pod will keep running, if it was scheduled, before the Taints was added.PreferNoSchedule- if a Pod does not have a matching Toleration, Kubernetes will try to not schedule it on that Node, but it will, if it has no other available Nodes. The Pod will keep running, if it was scheduled, before the Taints was added.NoExecute- if a Pod does not have a matching Toleration, Kubernetes will not schedule it on that Node. If the Pod is already running on the Node, Kubernetes will evict it and re-schedule it on a new Node.
Use-cases
Some use-cases for Taints are Tolerations are:
- dedicated nodes - if you have different types of nodes, dedicated for different workloads in the same cluster, you can use Taints and Tolerations to make sure each Pods are scheduled on the right nodes.
- nodes with special hardware - if you a set of nodes that have some special hardware (for example, GPUs) you can use Taints and Tolerations to make sure that only the Pods that need that hardware are scheduled on these nodes
- eviction - you can implement a logic that adds a
NoExecutetaints on a Node if certain conditions are met. This will evict all Pods from that Node and reschedule them on different Nodes. Kubernetes uses Taints with theNoExecuteeffect to make sure that no Pods are scheduled on Nodes that are consider not ready or have some sort of hardware issues (disk, CPU) or networking problems (unreachable nodes, etc.) Also, if you want to remove a Node, you can add aNoExecutetaint before actually removing the Node, to ensure a smooth transition of all Pods to the other Nodes.
ResourceLimits
For each Pod, you can specify how many resources a container needs (requests) and what is the maximum (limit) that the container can get.
The Kube scheduler will use the information from requests when scheduling a Pod onto a Node.
The Kubelet will enforce that no container gets more resources than its limit.
Specifying Resource limits in Kubernetes is optional but highly advisable. If you don’t set resource limits for a container and that container has a problem like a memory leak, it will use all the Node’s memory and starve all other workloads on that Node out of memory.
Summary
This is all for part two. I hope you enjoyed it and learned something new.
The series continues with Part 3.
If you don’t want to miss it, you can follow me on Twitter or LinkedIn.